In science on tuesday we did a expirement on distillation
Aim: to remove water from coke using distillation
Equipment: bunsen burner, trypod, heat mat, gause mat, retort stand with clamp, delivery tube and bung, beaker, conical flask, boiliing tube, coke and ice with water
Method:
1. pour about 100 mL of your coke in to your conical flask
2. put the bung and delivery tube in the top of the conical flask
3. then put your boiling tube in the clamp
4 put the bottom of the boiling tube in the beaker with the ice with water and then put the other end of the deliver tube in the top of the boiling tube
5. light the bunsen burner then put it under the tripod that has the conical flask
6. once the water has evaporated turn off the gas
Results: once my coke started to boil it only boiled on one side and made a wavy pattern once i there was a medium amount of water in the boiling tube i turned of the gas it took about 5 minutes i could move it to the sink and slowly run water on the conical flask to cool it down further.
how does distillation separate two liquid? it evaporates the liquid with the lower boiling point
what are the two chemical process in distillation: first is evaporation and the second is condensation
how is distillation used in real life? to make drinkable water, to make diesel, petroleum and alcohol etc
Showing posts with label science. Show all posts
Showing posts with label science. Show all posts
Thursday, 21 March 2019
Friday, 15 March 2019
sugar crystals in science
we made started to make sugar crystals in science
Aim:to make sugar crystals
Equipment: Beaker (x2), Bunsen burner, heat mat, try pod, gause mat, styrofoam cups for each person in your group, Popsicle sticks, measurig cylinder, stirying rod, sugar, water , food colouring (optional) and time to let it sit.
Method: get your 50 ml of water to boiling then turn of the heat and slowly add sugar small bit by small bit and mix it until the sugar dissolves and then when after about 2 minute of the sugar will not dissolve any more then add a couple drops of food colouring if you want then pour in to as many cups as in your group then put your Popsicle stick in your cups after wetting the Popsicle stick and covered it in sugar and let it sit for a couple days
Results: on the fifth day we ate it. it tasted like sugar some time in between someone broke all the candy

Aim:to make sugar crystals
Equipment: Beaker (x2), Bunsen burner, heat mat, try pod, gause mat, styrofoam cups for each person in your group, Popsicle sticks, measurig cylinder, stirying rod, sugar, water , food colouring (optional) and time to let it sit.
Method: get your 50 ml of water to boiling then turn of the heat and slowly add sugar small bit by small bit and mix it until the sugar dissolves and then when after about 2 minute of the sugar will not dissolve any more then add a couple drops of food colouring if you want then pour in to as many cups as in your group then put your Popsicle stick in your cups after wetting the Popsicle stick and covered it in sugar and let it sit for a couple days
Results: on the fifth day we ate it. it tasted like sugar some time in between someone broke all the candy

day one soild on top
other facts
what is a saturated solution : is when something is so concentrated that it can not dissolve or absorb any more solute in to it for example say it was raining and you had to walk to school and your clothes get so wet that it can not get any any more wet.
why do you do you use a saturated solution to grow crystals: because it means that the solute separates from the liquid and forms on around the smaller crystal to make a bigger crystal?
Monday, 21 January 2019
Filtration in science
We done a expirement trying to fillter real dirty water in to cleanish water
Method: we filled a large becker with dirty water we got a funnel and a conical flask we half filled the funnel with pebbles to fillter out the larger solids from the water then we took the pebbles from the funnel and used the water from the conical flask and repeated the prosess again but with charcoal then we tipped out the charcoal and used the water from the conical flask again but this time we used fillter paper and a clean conical flask then the water was cleaner than what it started as but i still would not drink it cause it was still light brown it would of turned out better if we did more steps it would of be cleaner
here are two fillters for real world situations
Method: we filled a large becker with dirty water we got a funnel and a conical flask we half filled the funnel with pebbles to fillter out the larger solids from the water then we took the pebbles from the funnel and used the water from the conical flask and repeated the prosess again but with charcoal then we tipped out the charcoal and used the water from the conical flask again but this time we used fillter paper and a clean conical flask then the water was cleaner than what it started as but i still would not drink it cause it was still light brown it would of turned out better if we did more steps it would of be cleaner
here are two fillters for real world situations
Monday, 26 November 2018
my electro magnet
i made my own electro magnet i found out it had to have about ten volts then i made some changes that the teacher suggested and it works with 3 volts and 1.5 volts that is a double a battery
here of some photos of it before and after
this was my test to see if hire voltages made the strength more powerful
0.5volt 110 paper clips
1 volt 7 paper clips or 27 paper clips
1 volt 110 paper clips
turns out it was not more powerful the hire the voltage
1 volt was the same strength as 10 volts
Before


After


Thursday, 1 March 2018
work
A. Top Of Letter Analysis
1. Sign your name on a sheet of writing paper, and get someone else to try to copy it.
2. Place the tracing paper over both signatures, and make a dot at the top point of each letter – for both signatures
3. Join up the dots for both signatures to get two zigzag lines across the signatures. Are the lines the same?
1. Sign your name on a sheet of writing paper, and get someone else to try to copy it.
2. Place the tracing paper over both signatures, and make a dot at the top point of each letter – for both signatures
3. Join up the dots for both signatures to get two zigzag lines across the signatures. Are the lines the same?
Monday, 20 November 2017
glow bubbles
Aim: My aim is to make glow in the dark bubbles that work.
Equitment:
Items to buy
(1) 1 X Impact Highlighter 10 Pack Yellow Detailshttps://www.warehousestationery.co.nz/product/W2213385.html
$9.95 at warehouse statonary
Equitment:
Items to buy
(1) 1 X Impact Highlighter 10 Pack Yellow Detailshttps://www.warehousestationery.co.nz/product/W2213385.html
$9.95 at warehouse statonary
(2) 3 X
Necessities Brand Dishwash Liquid 1.8L Detailshttps://www.thewarehouse.co.nz/p/necessities-brand-dishwash-liquid-1.8l/R2166621.html 2.each
$6.00
Necessities Brand Dishwash Liquid 1.8L Detailshttps://www.thewarehouse.co.nz/p/necessities-brand-dishwash-liquid-1.8l/R2166621.html 2.each
$6.00
total cost $15.95
All ready have
(1) 1 Bucket
(2) 1 empty old bubble container
(3) 1 small old container
(4) black light
Method:
(1) pour about half a litre of soap with about 250 ml of water in to the bucket
(2) Take The Ink Containers out of 2 of the highlighters
(3) put Ink part of the highlighter into the container with some water and squeeze it there untill the color is all in the soapy water
(4) mix it with the rest of the ink stick
(5) put the mixtures together and mix it together
(6) then turn all normal lights of and turn the black lights on
(7) then blow the bubbles
All ready have
(1) 1 Bucket
(2) 1 empty old bubble container
(3) 1 small old container
(4) black light
Method:
(1) pour about half a litre of soap with about 250 ml of water in to the bucket
(2) Take The Ink Containers out of 2 of the highlighters
(3) put Ink part of the highlighter into the container with some water and squeeze it there untill the color is all in the soapy water
(4) mix it with the rest of the ink stick
(5) put the mixtures together and mix it together
(6) then turn all normal lights of and turn the black lights on
(7) then blow the bubbles
Tuesday, 26 September 2017
Finding Drinking Water
Finding Drinking Water
Purpose:


I want to be able to turn salty ocean water into drinkable water
Research:
Making Ocean Water Drinkable by King of Random
Bottle Distillation by Nighthawk Light
Aim:
I want to find out how to separate the salt from the salty water.
Equipment:
- two empty beer bottles
- bunsen burner
- salt water
- stand and clamps
- metal tray pans
- Sand
- damp rag
Method:
- Put some salt water into a empty beer bottle be able to turn it on its side with out the water coming out.
- Put one pan above the bunsen burner and the other the same height
- Put sand in the trays
- put the bottles firmly in the sand
- wet the sand with the bottle in the not above the flame and put the damp rag on the bottle
- turn on the fire on
- wait about 15 minutes
it will lose most of the water
Results:
it work well and we got fresh water here are pics


Conclusion:
do not use aluminium trays or foll next time be cause when it is above the flame it will burn and sand will fall out the hole
Evaluation:
it worked well but it was very flimsy to put the mouths together I would consider doing it again
Tuesday, 29 August 2017
houara in science 2

- the dry bread went hard and the wet bread went soft
- there is moisture in the dry bread and more in the wet bread because of the germs starting to grow

brown bread
same as the white bread
- there is moisture in the dry bread and more in the wet bread because of the germs starting to grow


glut free bread


the glut free bread both have gone soft and absorbed the mosture
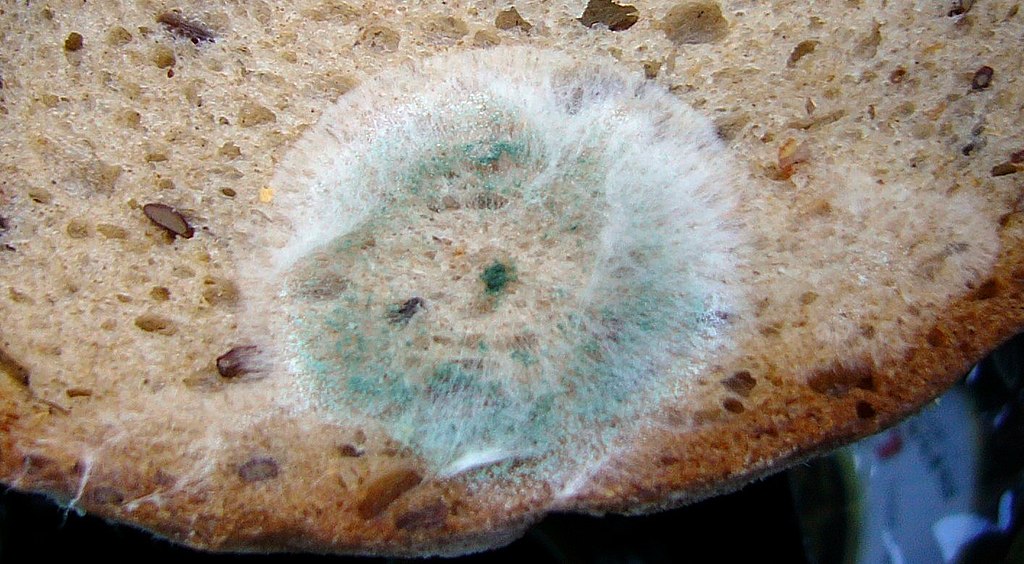
here is a picture of fungus on bread
| Description |
Mold on a slice of bread.
|
| Date | 15 June 2006 |
| Source |
English: Photo taken by myself
Deutsch: Selbst gefertigte Fotografie
Français : travail personnel
|
| Author | User:Mattes |
Results:
1 week later
 white bread the wet one has grown green and yellow mould and gone soft, the dry one grew very small dot of green and went hard
  glu free the wet one grew lots of green and yellow mould and went soft, the dry bread grew lots of black mould and a little bit of green mould and wet slightly hard but still squishi
 brown bread the wet one grew a bit of green and red mould and went soft, the dry bread grew the tiniest dot of green mould
Conclusion:
mould.
Something:
something
Tuesday, 22 August 2017
Hauora in science
🅰🅸🅼 I want to find out what bacteria grows the fastest
Ⓜⓔⓣⓗⓞⓓ
Ⓔⓠⓤⓘⓣⓜⓔⓝⓣ
6 snap lock bags
2xwhite 2xbrown 2xglufree bread
Ⓢⓣⓔⓟⓢ
Ⓢ1 get 6 plastic bags just put bread strait in on one . wet one then put in bag
Ⓢ2 wait 1 week take pics before and after
Ⓢ3once the first piece has grown mould wait for the next piece to grow mould
Ⓢ4 explan what happend
Ⓢ5 publish this post
Ⓜⓔⓣⓗⓞⓓ
Ⓔⓠⓤⓘⓣⓜⓔⓝⓣ
6 snap lock bags
2xwhite 2xbrown 2xglufree bread
Ⓢⓣⓔⓟⓢ
Ⓢ1 get 6 plastic bags just put bread strait in on one . wet one then put in bag
Ⓢ2 wait 1 week take pics before and after
Ⓢ3once the first piece has grown mould wait for the next piece to grow mould
Ⓢ4 explan what happend
Ⓢ5 publish this post
Tuesday, 15 August 2017
flame colours
Orange is calcium chloride
light orange is sodium chloride
yellow is barium chloride
red is strontium chloride of strontium nitrate
apple green is borax
hot pink is lithium chloride
blue is copper chloride , butane
green is copper sulfate ,doric acid
violet is 3 parts of potassium sulfate and 1 part of potassium nitrate
light orange is sodium chloride
yellow is barium chloride
red is strontium chloride of strontium nitrate
apple green is borax
hot pink is lithium chloride
blue is copper chloride , butane
green is copper sulfate ,doric acid
violet is 3 parts of potassium sulfate and 1 part of potassium nitrate
hands on fire
The purpose of this experiment to learn how to follow instructions and BE SAFE.
DO NOT TRY THIS WITHOUT SUPERVISION OF A TRAINED PROFESSIONAL.
Aim:
I want to safely be able to set myself on fire.
Equipment:
water
soap (detergent)
lighter
safety glasses
lab coat
Method:
1. Be SAFE.
2. Wet your hands, wrists and forearms.
3. Grab a scoop of bubbles.
4. Hold the bubbles up in front of your face, as far away from you as you can. Lock your elbows.

5. To get rid of the fire, SLOWLY move your hands a part.
6. DO NOT DROP YOUR HANDS BELOW YOUR EYE LEVEL because fire goes up and you will set yourself on fire.
What happened?
there was a large ball orange of fire. it was orange because it was burning calcium chloride
heat wave moved faster up than the flame because of the density of the heat wave
the flame went up because of the density of the flame
you could smell smoke and smoke of the fast reaction not all of gas had time to fully evaporate
DO NOT TRY THIS WITHOUT SUPERVISION OF A TRAINED PROFESSIONAL.
Aim:
I want to safely be able to set myself on fire.
Equipment:
water
soap (detergent)
lighter
safety glasses
lab coat
Method:
1. Be SAFE.
2. Wet your hands, wrists and forearms.
3. Grab a scoop of bubbles.
4. Hold the bubbles up in front of your face, as far away from you as you can. Lock your elbows.

5. To get rid of the fire, SLOWLY move your hands a part.
6. DO NOT DROP YOUR HANDS BELOW YOUR EYE LEVEL because fire goes up and you will set yourself on fire.
Results:
What happened?
there was a large ball orange of fire. it was orange because it was burning calcium chloride
heat wave moved faster up than the flame because of the density of the heat wave
the flame went up because of the density of the flame
you could smell smoke and smoke of the fast reaction not all of gas had time to fully evaporate
Sunday, 19 September 1999
Kaitiakitanga
Aim: I want to make a simple vege garden
Equitment:
scissors
egg carton
soil
seed of your choice
Method:
1 Get egg carton and fill it with soil
2 Put a hole with your index finger
3 Put a seed in and cover it with soil
4 Water it daily but do not drown it
5 wait for it to sprout
6 plant it in the garden
Results:
Discussion:
Water cycle song
Equitment:
scissors
egg carton
soil
seed of your choice
Method:
1 Get egg carton and fill it with soil
2 Put a hole with your index finger
3 Put a seed in and cover it with soil
4 Water it daily but do not drown it
5 wait for it to sprout
6 plant it in the garden
Results:
Discussion:
Water cycle song

Subscribe to:
Posts (Atom)